Displaying Simple Bitmaps in MicroPython
MicroPython's framebuf library contains functions to draw primitives, display 8x8 pixel size text, and a blit function that allows you to draw your own custom bitmap to the display.
It's capable of doing 16-bit colour but to keep things simple and small, this is how to do it in 1-bit (on/off).
The hardware I'm using is a Raspberry Pi Pico RP2040 (running MicroPython 1.18) and an SSD1327 128x128 OLED display.
To handle the image conversion, I'm using the GIMP.
First, you need a picture that works well as a 1-bit image. Whether you draw it yourself or take a photograph, or are making your own custom font, as long as it's small enough to fit in the microcontroller's memory and is viewable on the display, you should be off to the races.
I'm going to use the Squirrel's Lair logo:

And I want the display to show a small version of it at the top left.
Loading it into GIMP I can see it's 307x254 pixels, which is too large to fit on the display, so I resized it so that the largest dimension (307) was downsized to 32:
![]()
So now I have an image that's 32x27 pixels. So far, so good. Now to convert it to 1bpp - in GIMP, that's Image -> Mode -> Indexed -> Use black and white (1-bit) palette, and hit Convert.
That gives me an image that looks like this:
![]()
Which is the right size and only 1bpp. Depending on how you want your image to appear, you can invert the colours (in GIMP, that's Colors -> Invert).
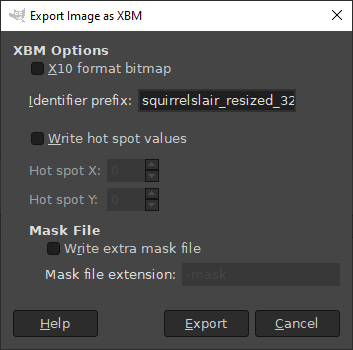
So now we've got a nice little logo to show. Since it's a small image and the RP2040 has a good amount of RAM, the easiest thing to do is embed the bitmap right in the program. To make this easy, use GIMP to export the image as a .xbm file with the following settings:

If you open the .xbm file you created in a text editor, you'll see something like the following:
#define squirrelslair_resized_32_1bit_not_inverted_width 32
#define squirrelslair_resized_32_1bit_not_inverted_height 27
static unsigned char squirrelslair_resized_32_1bit_not_inverted_bits[] = {
   0x00, 0x00, 0x00, 0x00, 0xf0, 0x00, 0x00, 0x00, 0xfc, 0x03, 0x00, 0x00,
   0xfe, 0x07, 0x50, 0x00, 0xfe, 0x0f, 0x70, 0x00, 0xfe, 0x0f, 0xf8, 0x00,
   0xfe, 0x0f, 0xf8, 0x01, 0x8e, 0x0f, 0xf8, 0x01, 0x84, 0x0f, 0xfc, 0x03,
   0x80, 0x0f, 0xfe, 0x39, 0x80, 0x0f, 0x3f, 0x44, 0xc0, 0xe7, 0x3f, 0x44,
   0xc0, 0xf7, 0x3f, 0x46, 0xc0, 0xfb, 0xff, 0x3f, 0xc0, 0xff, 0xff, 0x01,
   0xc0, 0xff, 0x7f, 0x00, 0xc0, 0xff, 0x1f, 0x00, 0xc0, 0xff, 0x1f, 0x00,
   0xc0, 0xff, 0x3f, 0x00, 0xc0, 0xff, 0x3f, 0x00, 0x80, 0xff, 0x3f, 0x00,
   0x80, 0xff, 0x1f, 0x00, 0x00, 0xff, 0x1f, 0x00, 0x00, 0xff, 0x0f, 0x00,
   0x00, 0xfc, 0x07, 0x00, 0x00, 0xf0, 0x3f, 0x00, 0x00, 0x00, 0x00, 0x00 };
The data between the {} is the bitmap. Displaying it in MicroPython is pretty easy:
from machine import Pin, I2C
from ssd1327 import SSD1327_I2C
import framebuf

# JUST THE TEXT BETWEEN THE CURLY BRACKETS!
bitmap_data = bytearray([0x00, 0x00, 0x00, 0x00, 0xf0, 0x00, 0x00, 0x00, 0xfc, 0x03, 0x00, 0x00,
   0xfe, 0x07, 0x50, 0x00, 0xfe, 0x0f, 0x70, 0x00, 0xfe, 0x0f, 0xf8, 0x00,
   0xfe, 0x0f, 0xf8, 0x01, 0x8e, 0x0f, 0xf8, 0x01, 0x84, 0x0f, 0xfc, 0x03,
   0x80, 0x0f, 0xfe, 0x39, 0x80, 0x0f, 0x3f, 0x44, 0xc0, 0xe7, 0x3f, 0x44,
   0xc0, 0xf7, 0x3f, 0x46, 0xc0, 0xfb, 0xff, 0x3f, 0xc0, 0xff, 0xff, 0x01,
   0xc0, 0xff, 0x7f, 0x00, 0xc0, 0xff, 0x1f, 0x00, 0xc0, 0xff, 0x1f, 0x00,
   0xc0, 0xff, 0x3f, 0x00, 0xc0, 0xff, 0x3f, 0x00, 0x80, 0xff, 0x3f, 0x00,
   0x80, 0xff, 0x1f, 0x00, 0x00, 0xff, 0x1f, 0x00, 0x00, 0xff, 0x0f, 0x00,
   0x00, 0xfc, 0x07, 0x00, 0x00, 0xf0, 0x3f, 0x00, 0x00, 0x00, 0x00, 0x00])

# Now put that bitmap into a blittable framebuffer.
# the 32 and 27 are the x and y dimensions of the image.
# framebuf.MONO_HMSB means it's a 1bpp image with MSB first.
framebuffer_to_show = framebuf.FrameBuffer(bitmap_data, 32, 27, framebuf.MONO_HMSB)

# Now set up the display instance.
# Your setup will change depending on the MCU and display
# you have and pins you use.
# Using the Pico I2C channel 1 on pins 6 and 7, and the
# OLED is an SSD1327 that's 128x128 pixels.
display = I2C(1, sda=Pin(6), scl=Pin(7), freq=400000)
oled = SSD1327_I2C(128, 128, display)

# Now clear the display
oled.fill(0)
oled.show()

# And blit the image to the display at coordinates 0,0:
oled.framebuf.blit(framebuffer_to_show, 0, 0)
oled.show()
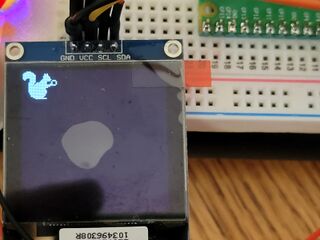
And here's the result (sorry about the condition of the film on the display!):
